
Whether you’re joining us in Pyr, the Banc, Minnie, or one of our other datasets, you should now be familiar with the basics of the Spelunker interface.
In this guide, we’re going to go over some of the more “hidden features” of Spelunker that will take your proofreading to the next level!
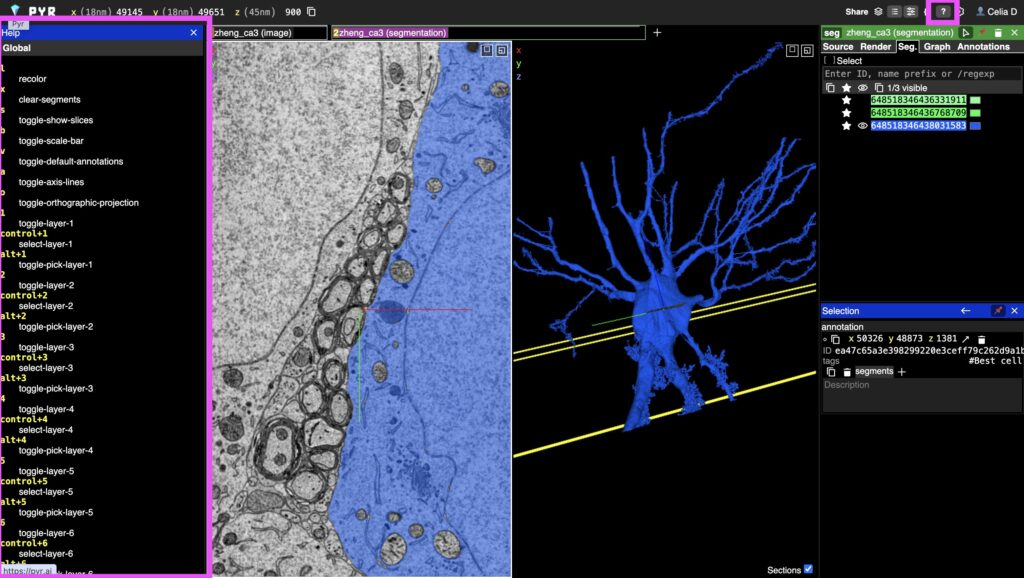
Help Menu
The first thing you’ll want to know about is the Help Menu which you can access using the “H” Key, or by clicking the “?” key in the upper righthand corner of the screen. Hitting “H” again will hide this menu.
Hotkeys
The help menu is auto-generated, so you may need to do a bit of detective work to figure out what some of the controls do.
Let’s go over the first section of hotkey controls to help clarify what they do.
| Name | Hot Key | Description |
|---|---|---|
| Recolor | L | Randomly recolors all segments |
| Clear Segments | X | Hides all visible segments (non-permanent, segment IDs still remain in the list) |
| Show Slices | S | Reveals/removes EM plane in 3D |
| Scale Bar | B | Reveals/removes scale bar at the bottom of the EM plane. Bar indicates scale in microns at current zoom level |
| Bounding Box aka “default annotations” | V | Toggles the visible yellow bounding box that indicates the boundaries of the current dataset |
| Axis Lines | A | Reveals/removes red/green/blue axes that point at your current location and indicate x/y/z planes |
| Orthographic Projection | O | Toggles on/off orthographic projection |
In-depth explanation of these Hoykeys below:
Segmentation Menu
The Segmentation Menu is where you can access information about the segments you are working with. Segment IDs are visible in this menu, and segments can be copied in or removed via the Segmentation Menu as well.

This video goes into more detail about how to use the segmentation menu, including some tips that might not be obvious at first glance.
One more tip not mentioned in this video that can be helpful for organization:
- To make a segment invisible, but keep its ID in your list – double click on it
- To remove a segment visually AND remove its ID from your list – Shift+double click on it
Shift+double clicking on segments can more quickly permanently remove segments you no longer need, and prevent clutter from piling up.
Color Picker
Here are a few tips on how to change the colors of your segments, including a few hidden details! Changing your segmentation colors is never necessary, but many proofreaders find they prefer a variety of color choices for various purposes.
If you’re feeling really bold you can also change the background color of both your EM plane and 3D background, but it’s mostly just recommended for fun screenshots!

Annotations and Tags
In this section we’ll learn more about commenting on your annotation points, including adding custom tags with a single click.
Video overview
The above video shows an in-depth explanation of commenting on annotations and adding tags. Keep reading below for a written description in case you need a refresher.
Add annotations and descriptions
When adding annotation points, first make sure you are in the annotation layer you want.

Once you’ve added your annotation points, you should be aware of the following:
- Left-click an annotation point to highlight it. Your highlighted annotation will be purple, and any descriptions or tags you add will be attached to the highlighted point. ‼️IMPORTANT: The highlighted annotation is NOT the same as the currently selected annotation
- Right-click to select an annotation. Your view will become centered on this point. This will NOT change the highlighted annotation.
- You can add a custom description by typing into the “Description” box under the “Selection” section. This attaches to the currently highlighted annotation.
Tags
Tags are custom labels that you can create and attach to hotkeys. This can help speed up your notation on your annotation points, and is extremely useful when sharing information about a cell with others who may have interest.

- To add a tag, type your tag into the box that says “Tag Name.” Press ENTER or the “+” button to activate your tag.
- To apply a hotkey: In the brackets [ ] next to your tag name left-click and hold. While clicking, type the key you’d like to associate with this tag.
- You can alter or delete tag names and hotkeys. Anything altered or deleted will be applied to all currently existing instances of that tag.

- To add your annotation click Shift + hotkey. Your tag will attach to the highlighted annotation point. You can also see it in the “Selection” section.
Scrub through annotations (brackets)
‼️Note: this feature is not currently available on Pyr, but works with other versions of spelunker.
The bracket keys will allow you to easily scrub through a list of annotation points. You may find multiple uses for this feature, but a common use is to help with visual alignment of misaligned slides, as demonstrated in the following video:
Rotating the EM (and fixing mistaken rotation)
Many people find that rotating their EM image plane can be helpful in visually aligning their 2D and 3D images.
However, some people end up accidentally hitting the keys that activate rotation tools (oops!), which can lead to some frustration. Before we show the benefits of rotating, let’s go over how to fix accidental rotation.
Fixing mistakes (Z)
We can sum this up with just one letter – Z!
- Press the “Z” key to return to the closest aligned state after accidental rotation
- This works for all axes of rotation
- If you rotate too far, the closest aligned state may be different from the original state (see video in the next section for a longer explanation)
Aligning Images
Sometimes you would like your cell rotated in a certain direction so that you can understand its morphology better, or follow a branch in your preferred direction. It can be confusing if the EM images don’t match your rotated 3D image. This is where rotation comes in!
- Use the R and E keys to rotate the EM image clockwise or counterclockwise. This is the most commonly used way to rotate
- Use the Shift+drag in the EM to rotate the image around the Z axis. This is less commonly useful, but may be helpful for identifying segment directionality in some cases.
- Use “Z” to snap to the closest 90° angle when using R, or to the closest flat plane when rotating using Shift+drag.
- Use the “Sections” button (lower right of 3D image) or S key to toggle the EM plane in 3D image.